Monday, December 7, 2009

Kitchen Garden Success Story

Our friends, Tom and Lucy visited my raised bed kitchen garden this past fall and decided to go home and build one of their own. They located the garden near their driveway in a sunny location that they pass by everyday. Smart logic! This garden will be well tended or at least looked at on a daily basis so weeds, pests, harvest and water needs will never sneak up on them.

Landscape fabric was placed under the raised beds and between the beds to control weeds; a great use for this type of fabric and it will keep these new veggie gardeners from getting discouraged. Weeds also compete for water and nutrients so keeping them at bay makes sense.

They decided to build a hoop house over one of the 4'x8' beds to grow a cool season garden. Another plus to choosing a location that you pass by daily since the hoop house is hand ventilated each sunny day by opening the ends of the plastic. They have been picking greens here and there but yesterday they decided it was time to pick a bunch. That is a beautiful mess of collards, kale and Swiss chard. Tom plans on trying to grow greens and such all winter using the hoop house. Its so crazy it just might work...awesome job Tom and Lucy!!!


A beautiful bouquet of greens in December

Friday, December 4, 2009

Bury me in a Garden

Cousin Heintz and me checking up on the relatives
in Huntwangen, Switzerland

On my second visit to Switzerland my cousin Heinz picked my friend Diane and I up at the airport in Zurich and took us to the little village Hüntwangen, in the canton of Zurich where my Great Great Great Grandparents came from.

I had been there two years earlier with my husband and was anxious to show my friend. Heinz and his brother Peter still own some of the original property where my ancestors lived and farmed.

We stopped in the village and to look at the spot where my relative’s home had once stood before a fire destroyed it. My relatives lived in the customs house. (This village borders Germany). Then we walked to the chalet of my Great Aunt who had recently passed on. The house was for sale – (about $250, 000. U.S. currency). Heintz showed us around outside. The house was a traditional Swiss home with the barn attached and the remains of a small fenced garden on two sides. Heintz found an old pair of wooden skis that he used as a child in the barn. He spent many happy days in this old place with his mother’s family during school breaks and weekends.

We then walked into what appeared to be someone’s home which it was but also a small restaurant where we had some breakfast. Since I speak no Swiss German and my cousin is fluid in English, Heinz proceeded to ask the owner about some of our relatives. Since both of my Grandparents were from here, seems I am more connected to this village than Heinz. We had a good laugh over that and then he said we should go and check on some of my relatives.

He walked us over to a cemetery where the gardeners, yes gardeners were busy weeding and planting out the gravesites with summer annuals. I looked at him funny because he had told me on the last visit we couldn’t visit our ancestors gravesites because after 25 years they dispose of them (compost I guess) and give their spaces to the newly departed. It is because space is such a premium in a small country he explained. When we got there I realized that was the case and these sites were within the last two decades. But as he pointed out as the village was still very small and not many new folks ever moved in that many of them were indeed related to me.

It is interesting to be able to go back and see where your relatives once lived and worked. It gives you of sense of grounding that I can’t really explain; a piece of belonging really.

Heintz explained to me that when a loved one passes on in Switzerland you can put them in a cemetery for 25 years. You must provide finances to pay for the gardener during that 25 year internment or commit to doing it yourself but if you don’t keep it up you will be billed. At the end of 25 years you can have the headstone if you wish or if you are still here to get it.

This past August I was blessed to travel to Switzerland, Germany, Poland and Austria. This time we saw some other cemeteries in Switzerland and in Austria that were gardens and I’ve decided that I want to be buried in a well tended garden covered with herbs! I know I’m going to being living in an eternal garden with the Master Gardener Himself after I take my last breath but it makes me happy to think that my gravesite full of beautiful plants and flowers could bring peace and joy, a reminder of what is to come in heaven to those still on this earth.

These cemeteries are such a contrast to the ones I have visited in the states. No artificial flowers allowed here. They even provide vases and water if you want to pick fresh flowers to place on the gravesite.


Werfenweng, Austria

Salzburg, Austria

Friday, November 27, 2009

Thankful for Kitchen Garden


On Thanksgiving day I picked a huge salad of various greens fresh from my garden. It is so wonderful to skip out the front door to the kitchen garden and be able to have fresh veggies at the end of November.

This kitchen garden is new this year. We started building it in the early spring using various materials. I like to experiment to see what works well so I can share that information with others. I have beds of concrete blocks which might not be the most fashionable but are easy to find and construct into a raised bed, inexpensive, won't rot and I like the fact that I can plant companion perennial herbs and flowers in the blocks themselves without having to take up room in the main planting area.

Pine 2" x 12" boards were used to make 9 beds in the garden. Again easy to find and make into a raised bed using metal L brackets on the inside corners plus an added crosspiece in the center. Inexpensive too, materials for all 9 beds ran right around one hundred bucks. Of course they will decay in three or four years possibly but easy to replace at that time I figured.

This fall we have added more beds, my husbands insists I'm crazy and I must be forgetting we are only two people but that has never stopped me before...besides, I love to share with neighbors and friends. These beds are built out of rough sawn red cedar from a local mill and should last many years without rotting. The lumber costs more than pine but not will not have to be replaced as quickly.

Soil depths are experimental as well. How deep does a raised bed have to be any how? Well, that depends on who you ask I've found out. Everyone has a different opinion from 5 inches to 18 is what I hear is optimal so again I'm going to try differing depths and check it out for myself.
After taking a month off to see other gardens, relatives and friends in Europe at the end of summer I thought perhaps I had missed the widow of opportunity for planting a cool season fall garden. Even though I got a late start it hasn't effected my amount of green veggies I harvest daily.

By constructing two hoop houses, one portable greenhouse, and three cold frames I am amazed how well everything is doing. I hope to have produce all winter here in Middle Tennessee. Since I have no heat options in these temporary structures it will be interesting to see what will survive, what will croak and what will flourish in the coldest stretch of winter.
Currently I am growing brussel sprouts (in and out of protection), broccoli, cauliflower, bok choy, broccoli raab, spicy greens, arugula, kohlrabi, swiss chard, corn salad and shallots (no cover), six or so varieties of lettuce, cilantro, spinach, kale and some others that I will remember later.

It is great to know I can stir fry or steam fresh greens make salads for every meal (or whenever I get a hankerin). Best of all it is knowing it is organic...in a time when you see organic vegetables shipped in from China, it is good to know I don't have to wonder where my food is coming from or what has been put on it.
Local is the way to go and growing your own is the best way to ensure that but the next best thing is buying from the local farmers wherever you live.

Because I got a late start this year I bought transplants and then started seeds to keep a continual harvest going. I found my best transplants at Riverbend Nursery of Franklin, TN and great majority of the seeds I planted are from Renee's Garden at http://www.reneesgarden.com/ Renee has wonderful seeds and such a variety of new and fun veggies to grow. Some of the seeds I planted are in packets printed in Swiss German and since I can't read the packages I can't you where they are from...thank goodness for latin plant names!

I am so thankful for my family, friends, and the bountiful harvest from my kitchen garden.

Sunday, November 15, 2009

Kitchen Gardening in Pots

Love to garden but don’t have a big yard, or lots of extra time? Pot gardening may be just the ticket for you. It allows you the opportunity to have a beautiful garden in a small area, without having to spend a vacation day or your entire weekend to accomplish! All you need is a few pointers and your own natural creativity to get you on the road to pot gardening.

First you will need a pot. Pot being a relative term for any kind of container that has enough room for potting soil, plants, holes for drainage and can fit somewhere on your porch, deck or patio. Have a blast with this one...go to the antique or junk store, garage sales or even better look through your garage or attic. You will be amazed what you will find to use for planters! I have been known to use old chairs, bird houses, antique bed pans, large funnels, bird baths, old pots and pans, granite dishpans, buckets, baskets and my all time favorite, my sons’ work boots (of course they were size 14 and 15 – who could resist?) Of course conventional clay or lightweight plastic pots are wonderful as well and might be more appropriate for a front entrance.

Most vegetables, herbs and flowers love at least 6 hours of sun each day. For convenience sake locate your containers near the kitchen where you can run and quickly pick or snip fresh produce when you need it. A water source nearby is a good idea saving you time and frustration as you will need to water plants more often in a pot, especially during hot summers. Water as needed...being careful to avoid extremes of dry and wet...usually once in the morning. Form a habit of watering while you drink your morning brew...one more exciting reason to jump out of bed.

It is nice to pick a mixture of plants using various colors, shapes, and textures. . When it comes to design think outside the pot, anything goes. However, if that concept is scary, try the following basic formula:

Vertical interest: Choose a plant that is tall or a trellis for the center of the container, a real show stopper.

Mid-section: Use plants with lots of texture, blooms and foliage, fill it
out!

Bottom fall out: Plants with natural drooping tendencies go around the
edge, cascading down the sides as they grow.

In other words, you will need a thriller, fillers and spillers! Use transplants or plant seeds. The great thing about kitchen pots is that you can start in early spring with cool season veggies when the average daytime temperature is 60 degrees and nights average 40 degrees. As the weather warms to 70 -80 degrees with nights above 50 degrees you can switch to warm season crops. In many areas you can then start cool season veggies again in late summer for fall produce. With a little protection from freezing nights, some may be able to pot garden most of the year.

If your containers are large you can do what I do and recycle some plastic milk jugs, soda bottles and water bottles in the bottom before filling up with soil. This makes the container much easier to move around and less expensive. The roots need about 8 – 12 inches. Use potting soil, or compost or a mixture of top soil, peat moss, potting soil, compost, vermiculite.

Plant what you like to eat and try a few new things just for fun. Try theme gardening by planting a salsa garden with tomato, cilantro, green onions and hot peppers, or an Italian garden with tomato, eggplant, basil, garlic chives, marjoram and oregano.

Keep in mind companion planting; sweet alyssum to house beneficial insects or basil with tomatoes for improved vigor and flavor and to confuse those nasty hornworms. These are just two examples – pick up a copy of my book “The Cracked Pot Herb Book” for more companion ideas.

Here are some plant ideas for your kitchen pots – just to get you thinking…
Warm Season:
Thrillers – Lemon grass, okra, scarlet runner or pole beans on a trellis.
Fillers – Tomatoes, basil, eggplant, peppers, parsley, oregano, chives,
Spillers – thyme, alyssum, pinks, golden oregano

Cool Season:
Thrillers – Peas on a trellis, cilantro
Fillers – Kale, beets, lettuce, radish, chard, broccoli raab, arugula
Spillers, pinks, thyme, parsley

Fertilize if needed when you plant with a slow release variety granular (made for vegetables) for up to three months of worry free growth. Or add composted horse, cow or chicken manure each time you start a new crop. A compost tea can be used as well for a plant “pick-me-up” during the growing season if needed.

Look for vegetable, herbs and flowers developed with container growing in mind.


This year I'm growing plants for my kitchen garden pots from Renee's Garden
container collection -'Pizza My Heart' peppers, 'Super Bush' tomato, 'Little prince'
eggplant, 'Bush Slicer' cucumber and 'Pot of Gold' chard in my container kitchen gardens;
along with 'Window box Mini' small leaf basil, 'Italian Cameo' large leaf basil, 'Junior'
sunflowers and 'Pixie Sunshine' zinnias. All have been well behaved in their respective
pots and very productive. Renee's Garden offers container sized seeds online at 
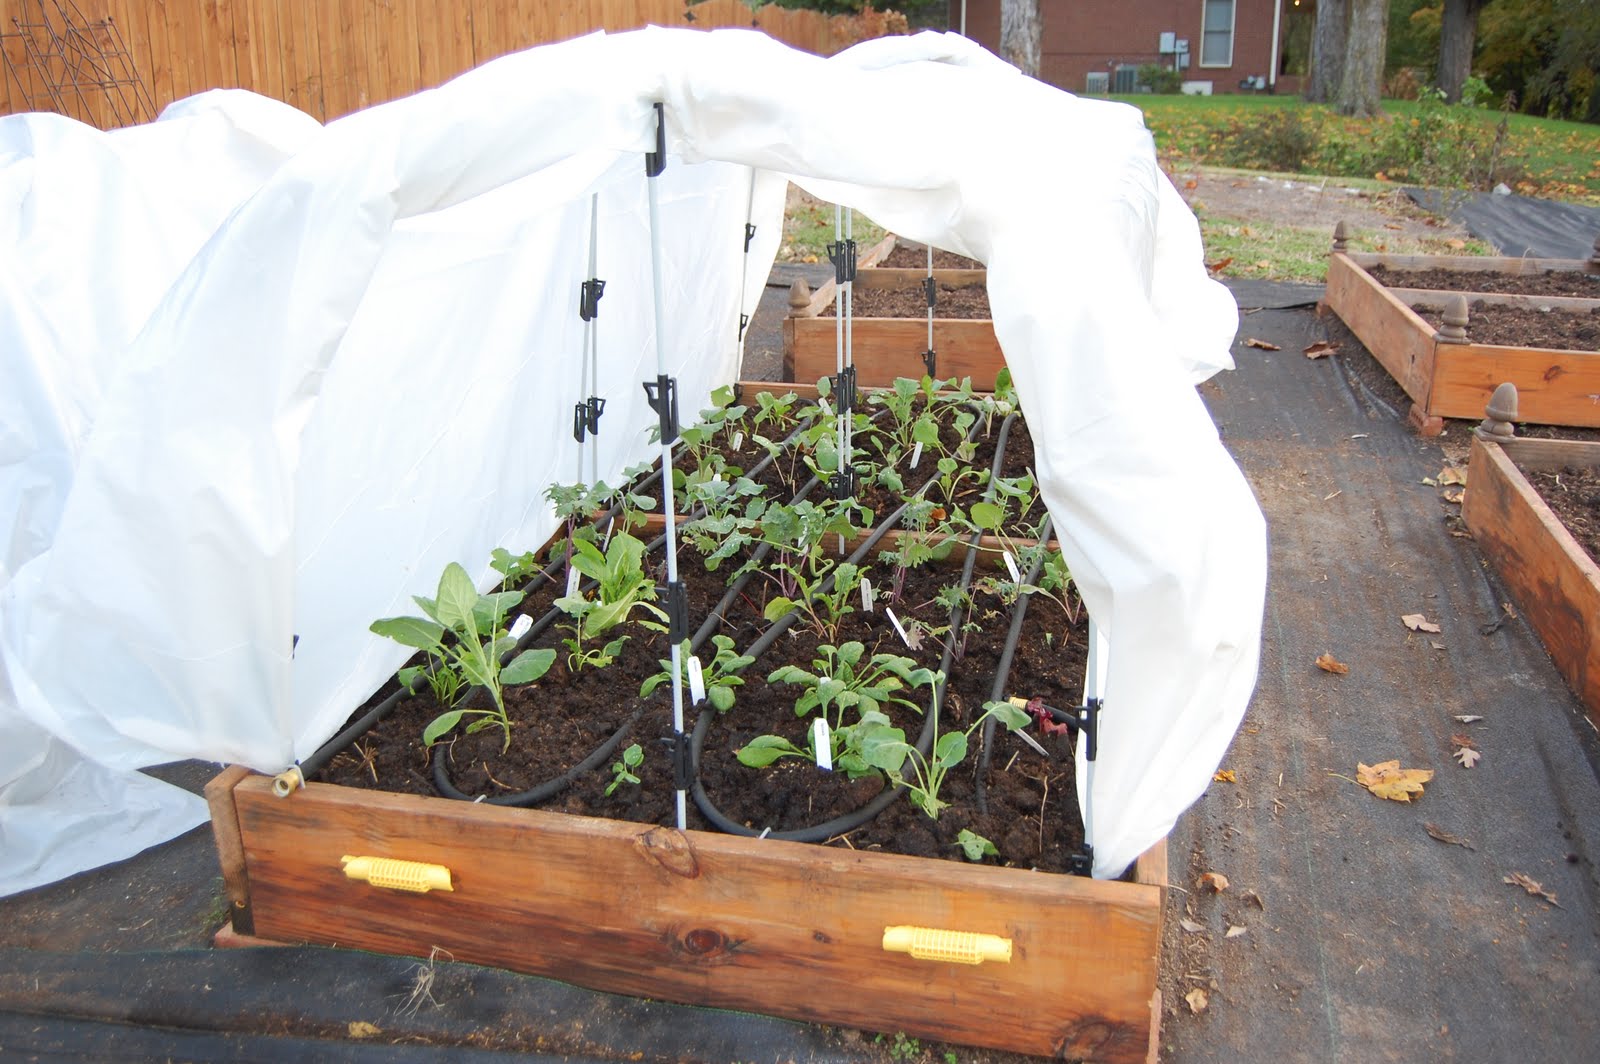
http://www.reneesgarden.com/seeds/seeds-hm/collections.htm


Here are some photos of the Kitchen Garden Pots progress thru the year......

MAY KITCHEN GARDEN POTS


JUNE KITCHEN GARDEN POTS


JULY KITCHEN GARDEN POTS


SEPTEMBER KITCHEN GARDEN POTS


NOVEMBER KITCHEN GARDEN POT


Here is a photo example of using recycled plastic bottles and jugs to take up extra space in your large containers.


Sunday, November 8, 2009

Pomanders: A Christmas Tradition


Every Autumn I find myself drawn to the lemon and lime section in the produce department. I start imagining the smell of citrus, cloves and cinnamon, which takes my mind on a quick journey down Christmas Lane.

What is a pomander you ask? Good question! According to the dictionary, a pomander is: (noun) a mixture of aromatic substances enclosed in a perforated bag or box and used to scent clothes and linens or formerly carried as a guard against infection; also : a clove-studded orange or apple used for the same purposes.

Now you know, right? Well, in case it still isn’t that clear, let me try to shed even more light on the subject. The history of pomanders goes back to the Middle Ages. Sanitation was not what it is today and people did not bathe as often as we do now. So some clever folks came up with a way to make life more pleasant by combining various herbs and spices to help mask undesirable scents and also by using certain herbs and spices to protect themselves from unwanted infectious viral and bacterial situations. They would wear perforated containers filled with an herb/spice mix, usually in a ball shape on their person; usually close to their noses where it could sweeten the air they breathed.

The Victorians brought pomanders or pomander balls into high fashion, combining practicability with beauty. They expanded on the uses to include household decorations, closet and drawer perfume/insecticide, Christmas ornaments and even wedding bouquets.

The tradition of pomander balls as Christmas ornaments is still in fashion today and a lovely way to add fun and scent to your holiday season. I have made these for years and it is an especially wonderful activity for the whole family. They are easy to make from lemons, limes, tangerines, oranges or apples. My favorites are lemons and limes. You can buy them by the bag full and they are just the right size to hang on the Christmas tree, in a garland, in doorways, mix in the mantle decorations or pile them up (after they are dried) in a rustic bowl with or without potpourri. I have even made mini topiaries with them! You can store them away to use year after year. They take three or so weeks to dry so get busy and make pomanders, start a new tradition with your family and make your home smell oh so festive!

How to Make Pomanders


Ingredients:

* Small to mid sized unblemished fruit – apples, oranges, lemons, limes, tangerines
* Large headed cloves*
* Ground cinnamon, (nutmeg, ginger, ground cloves)*
* Knitting needle, skewer, or nail
* Thimble or masking tape for fingers - optional
* Orrisroot – note: orrisroot is used to act as a preservative and scent enhancer Orrisroot is dried, powdered material from the Iris bulb. Some people are allergic to this so if you are concerned you can skip it or add sandalwood oil as an alternative preserver.
* Ribbons or raffia, tissue paper or paper bags

1. Use knitting needle, skewer or nail to pierce the skin of the fruit. You may want to use a thimble or cover fingers with masking tape. Insert cloves close together but not touching in straight vertical lines or patterns, covering as much of the fruit as possible. Be sure to leave spaces for 1/8” ribbon to run down two sides, crisscross at bottom and come back up opposite side of fruit for hanging purposes if you choose to do so. Otherwise cover entire fruit with cloves.
2. In a glass bowl, combine powdered orrisroot (again you can omit or use sandalwood oil), ground cinnamon and other ground spices if you like – experiment to find which combination you like best. For 6 limes I use approx. ½ cup cinnamon and 8 drops of sandalwood oil. If you add the other ground spices try 1 tablespoon each (including the orrisroot) to the cinnamon mix. Pour spice mix in a zip lock bag. Place the clove-studded fruit in the bag, rolling around until entire fruit is covered with spice mixture.
3. Shake off excess spices, use ribbon or raffia and hang pomander ball on drying rack, doorways (I’ve used the kitchen cabinet knobs or the chains on the ceiling fans!), etc. If you are not going to hang them, then wrap each pomander in tissue or small paper bag (newspaper may work as well) and store in a cool, dry place for about 3 weeks. Be sure to check occasionally. Should one start to mold or rot, toss it out.
4. Display and enjoy your pomanders - Keep in mind this is not rocket science...be flexible and creative!

* You can find large containers of cloves and powdered cinnamon usually at Sams or Costco. Yarrow Acres in downtown Franklin, Tennessee has essential oils. You can order cloves, ground spices, etc. from the San Francisco Herb Co. Email address is http://www.sfherb.com/

For more information on "all things gardening" please check out my "Cracked Pot Gardener" book page at http://www.cindyshapton.com/book.html

Until next time....Make gardening fun or it will become work!!!

Tuesday, September 29, 2009

A Gift from the Compost Pile - Pumpkins!


Every year it is fun to see what springs up from the compost pile…squash, potatoes, melons, arugula, dill, just about every herb, vegetable and flower has lived in the compost pile at one time or another.

This year pumpkins took a turn and when I returned from Europe I found pumpkin vines had found their way up and over the fence, up and around the cedar trellis in the herb-kitchen garden, over the rosemary and through the tomatoes and basil plants. I arrived just in time to tame the beast before it took over the hops arbor!

It was hard to get upset with Ms. (or Mr. call it what you like this plant has both female and male flowers) Pumpkin plant; after all she did leave several off-spring of the loveliest soft peachie-orange color with a pleasant round fruit that looks like a Sasquatch (squash family?) had lightly trodden on during the last full moon.

What kind are they? Who knows…the original was a bluish green color with a similar shape when I bought it from a local farmer then later tossed it in the compost pile. It would be safe to say that it grew in the field next to some other kind of pumpkins or winter squash since this year is the same shape but a different color.

Pumpkins, gourds and squash all belong to the same plant species (Cucurbita pepo) which means they may cross…not the first year but if you save the seed or in my case allow those seeds to grow the second year in the compost you could get some surprises. Sometimes these changes are good and sometimes a little funky with different shapes, colors or warts.

If you have heard the rumor that anything in the curcurbit family can cross-pollinate including squash, pumpkins, gourds, melons and cucumbers that is just an ‘old wives tale’. We are talking about three different plant species, cucumbers (Cucumis sativus), melons (Cucumis melo) and squash, pumpkins and gourds (Cucurbita pepo). While the bees can carry pollen from flower to flower, the flowers only accept pollen from their own species.

Now, aren’t you glad we had this talk? You can sleep better knowing your cucumbers will never cross with those rascally gourds growing on the same trellis (as in my case) or your zucchini will never run away with your cantaloupe.
I am thankful for my gift of pumpkins (12 total) in the compost heap since the baby rabbits I allowed to grow in the bean patch repaid my kindness by eating all my pumpkin plants in the vegetable garden. I think I understand why Mr. McGregor was so upset with Peter Rabbit and his kind!

Monday, July 27, 2009

Stevia, An Herb That is Good for Your "Sweet Tooth"


When I think of summer I can’t help but think of warm evenings on the porch swing sipping an ice-cold glass of tea. Most of us make our tea nice and sweet by adding sugar or artificial sweetener to the tea brew. Yes, we even admit that sugar or that other stuff probably isn’t that good for us but sweet tea is a tradition and we can’t imagine not having it at lunch or at the next church picnic.

What if I told you there was an alternative to sugar and artificial sweeteners? An herb actually that you can grow yourself called Stevia (Stevia rebaudiana). This herb is native to Paraguay with leaves that are 30 times sweeter than sugar with no calories or adverse side effects. If it sounds too good to be true, just wait...stevia also has medicinal properties that are reported to be effective in the treatment of diabetes, skin diseases, hypertension, weight loss and infections!

Plant stevia in the herb garden or in a pot in the spring after the last frost, give it plenty of sunshine and water (no need to fertilize). Plan to buy a new plant each spring or bring it in during the winter months as stevia is a tender perennial that cannot withstand our Tennessee winters. I grow stevia in a pot for the summer then drag it into the garage after I have cut it back to about 3" tall. In the Spring I bring it back out and place it in a sunny spot outside the kitchen door where it is handy to use.
Start using fresh leaves during the growing season by adding a couple of leaves (adjust to your own taste) to any pot of tea (herbal or other) and steep as usual.

In the fall, cut the plant back and hang small bouquets upside down in a well ventilated area out of direct sun or place leaves in a dehydrator. When the leaves are dry and crumble easily store them in a tightly covered jar. You may want to grow several plants if you want enough to use all winter.
To use as a sweetener add part of or a whole leaf directly into hot tea or coffee where it can steep the sweetness into the hot liquid or grind leaves in a coffee grinder to use as a powdered sweetener in place of sugar. This takes some experimenting to get the right amount of sweet since stevia is much sweeter than sugar.

Stevia can take the place in any recipe calling for sugar or artificial sweetener. For more information on this incredible herb and recipes check out
http://www.stevia.net/

Beat the heat this summer while staying thin and healthy using your own home grown stevia to sweeten your ice cold tea...enjoy!

Saturday, July 4, 2009

Never Enough Thyme

How many times have you heard that play on words? Sorry, just seemed appropriate this morning. I have been enjoying my thyme this year in the gardens. As I took a brief inventory I realized I have lots of the stuff and many varieties.

I wish I would have made more permanent markers (if there really is such a thing) when I planted all the different varieties. I don’t mean to be a collector of thymes but I never miss an opportunity to purchase or grow from seed in the greenhouse a variety I don’t have.

Thyme is a wonderful Mediterranean plant that loves sunshine and good drainage. There are hundreds of varieties with different growing habits, fragrances and flavors. Thymes have a range of bloom times and colors, ranging from white to pink to reddish and purple.

Thyme plants are broken down into two main groups - upright clumpers or ground hugging creepers.

Usually the more upright varieties are used for cooking and medicinal applications. French, English, Lemon, Mother-of-thyme are just a smattering of upright varieties. Just for fun search out some of the more unusual like Orange, Lavender, Oregano or Pink chintz.

Creeping thymes are lovely between pavers, along sidewalks or on rooftops. In England I have seen ground hugging thymes used in lawns as a substitute for grass and on stone benches in the garden. These plants are pretty tough and are fun to use where they get stepped on occasionally to release the scent into the air and make any visit to the garden a sensory pleasure. Wooly, Alba, and Red creeping thymes are some varieties to try.

Thyme is a good companion in the kitchen garden to cucumbers, cabbage and tomatoes. The strong scent helps to discourage would-be pests while calling in honey bees to help pollinate crops. It appears to inhibit powdery mildew as well. I like to use different varieties throughout my landscape to provide a long window of blooms for the bees. Thyme does well in pots, I add it to my kitchen pot gardens.

As with any woody herb, the upright varieties like to be trimmed after it blooms. Thyme often browns out in the center after it is a year or three old. Sprinkle some potting soil in the center and watch it start to leaf out again.

Thymol, which comes from thyme’s essential oil, is a strong antiseptic that is used in mouthwashes and toothpastes. Thyme tea is a wonderful expectorant when you have a cold to help loosen the chest. It has also been used for intestinal worms, urinary tract infections and to disinfect wounds.

Thyme is also a good cleanser for oil skin. It can be used in hair rinses and in the bath with oats to soften skin.

It is easy to preserve thyme for later use by cutting small bouquets just as they start to come into bloom. Hang these little bunches upside down in a well ventilated area out of direct sunlight. When dry run the stems between your fingers and thumb to strip the tiny leaves onto a paper plate. This makes it easy to pour into a jar for storage. Label and place in the cupboard for best flavor retention.

Use excess thyme in wreaths, sleep pillows, potpourri. Cut fresh for small flower arrangements or tussie mussies.

In the kitchen snip fresh thyme into salads, dressings, dips, marinades, soups, steamed vegetables (I especially love it on summer squash). It is tasty on beef and snipped fresh on chicken while grilling.


Thursday, July 2, 2009

The Whys of Gardening - Banana Trees

Banana Trees June of 2009 - Below, Banana Trees in June of 2008


I was sitting in my living roof cabana, this morning having a cup and jo and praising the Lord for an incredible cool, sunny, low humidity morning. As my toes nestled into the carpet of thyme beneath my feet, the scent wafted up and I got to philosophying (don’t worry I made that up) and wondering about phenomenas in the garden.

The sun was coming up in the east like it is suppose to but I naturally put my hand up to shield my eyes because I hadn’t thought to bring my sunglasses.
That got me thinking, hey wait a minute, last year on the 2nd day of June I didn’t have this problem.

I planted two hardy banana trees, Musu basjoo last April (I can remember the exact date because my daughter called as I was digging the holes to tell me her water just broke and I might want to speed it up if I was going to make it in time for the arrival of my grand daughter) on either side of the cabana to block the morning and afternoon sun.

They (banana trees) were beautiful and worked perfectly plus they added something I hadn’t counted on, sound. The incredible large leaves make a lot of noise as the summer breezes knock them about. Not annoying white noise like air conditioners but a soothing rhythmic tune that one would expect to hear on a tropical island.

Sitting in the Adirondack chairs under the cool space of the living roof gazing a the movement and reflections in the water of the pool, listening to the beat of the banana tree leaves is not the best place for a gardener to sit for very long. If you are not careful you can catch a laid-back island attitude where all you want to do is nap, snack, read and drink fruity drinks with the cute little umbrellas.

This year my hardy banana trees are a bit too short to catch the wind currents and look more like a shrub. So, why is it those same banana trees are only half the height of last year? I followed manufacturer’s instructions and cut them back to about 6” after the first hard, killing frost and tucked them in for a long winters nap with a thick cover of soil conditioner.

I was thrilled when they sprouted up in the spring like they are suppose to. (They really are hardy) They grew quickly to about 3 feet or so and quit. I put a pile of compost around them for fertilizer this spring so the spring rains could wash it down to the roots. I keep them watered when it doesn’t rain, so why aren’t they doing their job and providing shade from the east and especially west sun?

And, I was driving in a nearby neighborhood this past spring and noticed that some folks had planted banana trees at the end of their drive and it looked to me like they had either never cut them back or they cut them at the point where the leaves formed. Well, they apparently don’t know anything about banana tree maintenance I thought.

Okay, so maybe I’m not as smart as I thought (I hate that) because while I thought I was doing everything correctly my trees are puny while their trees are tall and lush (yes, I drove back by recently to check it out). I think I’m going to hit them hard with Monty’s Joy Juice and see if they will shoot up before the dog days of summer set in…and you can bet I’m not cutting them to the ground this fall, I’ll take my chances and see if that will work better for next year. Feel free to lend advice.

Thursday, June 11, 2009

Bienveue a Lafayette


We recently visited Lafayette (pronounced ‘Laugh’ Fayette), LA where our son and his lovely wife toured us around. What a cool place to live. It’s like going to a foreign country without leaving the states. I never thought I would be telling folks I’m from the North when I live in Tennessee. Everything is new and different…flora, fauna, food and French weaved throughout, turning every outing into an adventure. The people are easy going and fun – loving as evidenced in the culture of southern Louisiana.
First stop was the welcome center where they had of course tons of information about the area but also, a small garden area, and a lake that boils with fish and turtles when you toss a slice of bread over the walkway railing.
Black-eyed Susan vines, knockout roses, trumpet flowers and agapanthus were blooming in the garden. We saw agapanthus in bloom throughout the area…it must be hardy this far south.

A music festival was going on in Opelousas, the heart of zydeco (in fact they’re claim to fame is “Zydeco capital of the world”. We danced a few steps when we realized we can’t dance like the natives…they’ve got some moves!

A trip to Lafayette would not be complete without a bowl of gumbo with roux the color of chocolate – yum. We went to a Sunday brunch at “The Blue Dog Café” where the mimosas flowed while the zydeco band (Hadley Catille and the Sharecropper) played on. Crawfish enchiladas and oyster stuffing were new to us and the creamed spinach was spicy. In fact most everything is spicy!
Drove a short distance to the country and toured an organic farm that grows and sells tilapia, veggies, fruit and a myriad of other natural products. The Grotreaux have a delightful family – 10 children between the ages of 5 and 12 who work, study, and play hard.
I had never seen a tilapia operation before. The fish are raised in ponds housed in greenhouses, fed four times a day and harvested once a week (2,000 lbs.) for market. Organic vegetables, fruits, herbs and flowers are harvested and sold at the local farmers market. Folks can also come to the farm and buy fresh fish and produce.
A short drive to St. Martin Lake proved successful in the hunt for gators to photograph. They are unique critters that I enjoyed watching from the window of a truck. Oh yeah, the cypress trees with their knees exposed and hanging with Spanish moss where also a sight for Deep South newbies. One final drive to see what I believe is a type of agave that my son had noticed and couldn’t wait to show me. You can see from the picture that it is ginormus – taller than the house! If anyone knows what this monster is, please tell…