Showing posts with label In the Kitchen Garden. Show all posts

Saturday, October 30, 2010

Towanda…Fried Green Tomatoes

It’s been a few years since I’ve practiced my skills of frying up green tomatoes but with the bumper crop of green tomatoes this fall I decided it was time. So, I put on my apron, let out a quick warrior cry of “Towanda” and headed to the garden to pick a mess of big green unripe fruit.

Everyone seems to have their own ‘secret’ recipe for fried green tomatoes and I always enjoy hearing the different ways folks prepare and season them. Over the years I have developed a pretty straightforward simple recipe that people seem to like (at least there are never any leftovers).

First, wash and slice tomatoes about ¼” thick. Allow the slices to sit and sweat for a 30 minutes to an hour. Sprinkle them with a seasoned salt, Emeril’s Essence which I make up myself (recipe below) or just sea salt and fresh ground pepper.


Coat each side with corn meal and let them sit again for 30 minutes or so. Yeah, I know seems like there is a lot of sitting around.
Heat (med-low temp) enough vegetable oil or coconut oil in a heavy cast iron skillet to cover the bottom to about ¼”. Fry until light to golden brown, then flip each slice over and fry. Add more oil as needed with each batch. Place on paper towels before placing on serving dish. Serve warm (with a pinch of grated parmesean cheese on top). They are actually quite good cold out of the refrigerator too.
EMERIL'S ESSENCE
Ingredients
• 2 1/2 tablespoons paprika
• 2 tablespoons salt
• 2 tablespoons garlic powder
• 1 tablespoon black pepper
• 1 tablespoon onion powder
• 1 tablespoon cayenne pepper
• 1 tablespoon dried oregano
• 1 tablespoon dried thyme
Directions
Combine all ingredients thoroughly and store in a grinder or shaker jar.

Wednesday, September 8, 2010

A Bounty of Tomatoes


What’s a girl to do with a never ending supply of tomatoes from the kitchen garden? Put them up for winter of course. This was supposed to be a bad year for tomatoes here in Middle Tennessee but I gotta tell ya, my garden didn’t get the memo because they just keep coming and coming. I even dreamed about maters the other night. Every batch I finish I put all the equipment away for the year only to pull it out in a week and cook up a few more jars.

But, I promised myself this was it. There are only two of us, as my husband reminds me on a regular basis and Annie the dog doesn’t really like tomatoes. My crazy hens Cilantro and Coriander clean up the leftover ends and skins off the compost pile but that doesn’t help me with the front end production.

I have given loads away, I think my neighbors see me coming and hide…although they seem to like maters better than zucchini and really appreciate it if I turn those tomatoes into fresh salsa before I deliver to their doors. I call friends and invite them to come and harvest anytime but people are busy these days and they like them much better already in a basket left in a convenient place on their front porch. I call it my veggie ministry. I keep recycled plastic bags close at hand when I'm working in the kitchen garden, since it is in our front yard, one never knows when a passerby will stop to chat and I can bless them with a sackful of tomatoes.

We had a baby shower the other day and I was so happy to contribute bruchetta by the gallon. A fabulous way to use up lots of maters and it was delicious to boot (if I do say so myself)…of course what’s not to like about chopped tomatoes, garlic, sweet onion, sweet basil, a couple of shakes of sea salt and fresh ground pepper all mixed and drizzled with olive oil served up on toasted bagels with a little shaved parmesan cheese?

This year I canned just tomatoes, spicy tomatoes, Italian style tomatoes, tomato juice and salsa. Altogether I jarred (as they say here in the south) 30 quarts and 15 pints total.

It doesn’t end there, oh no…I couldn’t stand for tomatoes to go to waste so I froze 20 pints, pureed and quartered; great for soup, chili and stewed okra this winter.

Some summers are so crazy I just quickly wash tomatoes and freeze them whole in large plastic bags. Sounds like glass balls clinking every time I move them around while rooting in the freezer on routine archaeological digs (to make sure everything that went into the freezer is being used in a timely fashion). Later when I have time I will break out the frozen red balls, run some hot water over them which causes the skin to crack and peel easily then cook them down for canning.

If freezing and canning isn’t enough I also dehydrated 6 quarts of Roma and heirloom plum tomatoes; something wonderful to soak in olive oil and slather on salads and mix with pesto for pasta. Dried tomatoes are so tasty we eat them as a snack right out of the jar.

It seems like a lot of work but I know I will enjoy the ‘fruits of my labor’ this winter when home grown tomatoes from the kitchen garden are just a memory.

Here is a quick and easy recipe that I used to make an Italian blend all chopped in the food processor

20 cups of tomatoes – washed with any bad spots cut out then chopped in the food processor. My gardening neighbor pals, Jack and Al chop (with skins on) in a food processor the tomatoes they use for their summer production of salsa and they make 100s of jars to sell and no one is the wiser.
Peppers – seeded and chopped (food processor) use whatever sweet peppers you have to equal about 4 cups - I used 2 Italian fryers, 3 sweet bell, 2 pimento and 3 sweet banana

2-3 large sweet onions – chopped in the food processor.

6-8 cloves of garlic – pressed

½ cup chopped basil leaves

¼ cup chopped oregano leaves

1 Tablespoon brown sugar

1 Tablespoon sea salt

Mix all together and simmer for 2-3 hours.

Ladle into hot and sanitized quart jars, seal. Can be water bathed for 20 minutes to ensure a safe and sealed product. Makes about 6 quarts.


Friday, July 23, 2010

Tomato Woes

It seems that many tomatoes have been splitting this summer according to gardeners everywhere or at least those here in Middle TN. With the weather inconsistencies this year the norm has been stretched and vegetables are apparently confused. I feel like splitting myself some days to somewhere cooler, oh wait that happens every summer in the south.

Okay so why all the cracking and splitting? Really, consistent water is an issue for the vegetable garden. This gardening season has been dry periods followed by heavy rains. This is tough on tomatoes especially during the early stages. Rapid grow occurs which can cause splits. It usually doesn’t happen to the whole crop and some varieties tend to crack-up more than others.
The Vegetable garden in general needs about an inch per week to maximize production and prevent problems like splitting tomatoes. Soaker hoses or drip irrigation are better than overhead methods. However if you have only sprinklers to work with water in the mornings so the leaves have plenty of time to dry out and water for a longer period of time every 4-7 days (depending on temperatures and drying winds) rather than a little every day. The plants will appreciate the longer less frequent drinks and their roots will grow deeper into the earth making them more sustainable and stronger when the heat gets turned up or winds knock them about.

Mulch helps to keep weeds out and moisture in. Straw, hay, newspapers or leaves make great mulch for the kitchen garden.

Blossom End Rot is another common issue with tomatoes. The bottom of the fruit is brown to black with a moldy and gross look. A lack of calcium seems to be the reason and there are many thoughts as to why this happens. In my kitchen garden I usually have a few (BERs) in the beginning of the season and I think it is because I use rich compost from horse poop which causes quick acceleration in growth. Because of the high level of nitrogen the calcium needed isn’t available until more of the nitrogen breaks down. (Like I mentioned, my theory)

Another reason can be heavy rains which dilutes the calcium and other minerals available in the soil. I have read that plants exposed to extreme conditions in the greenhouse or at the nursery can add to this problem of Blossom End Rot.

To help prevent BER it is always a good idea to buy good plants or start your own. Do everything possible to have good garden soil with lots of organic matter and the proper pH. Water consistently and rotate crops every couple of years.

I have heard it helps to add egg shells to the soil at planting time to give a bit of a calcium boost or spray young plants with a calcium solution.

Blossom End Rot is not partial to tomatoes and many other veggies can have this problem. This year I had a couple of peppers, squash and even some okra with BER symptoms. For me in my garden it all disappears quickly before I have time to think or do anything about it giving me more time to focus on how in the world we are going to eat all these tomatoes!

Sunday, July 4, 2010

Dig This, Potatoes!

Digging potatoes from the garden is fun and rewarding. My children use to be amazed at all the spuds beneath the garden soil. It’s like Christmas in the summer time they used to say with excitement as they dug and made piles of taters.

This year I planted 4 – 4’x4’ raised beds (about 10” deep) in March with four different varieties of potatoes; Kennebec, Yukon Gold, Red Pontiacs and Irish.

When the plant blooms you can rob them for a few new potatoes by carefully digging beside a plant and pulling out a few little guys or just thin out the crop by removing a whole plant here and there. As the vines turn brown and start laying down it is time to harvest.


Potatoes should be harvested on a sunny day (I prefer morning) when the soil is dry. I use a large garden fork with wide spaced tines so as not damage any spuds. Never wash potatoes until you are ready to cook them, simply brush off excess soil with your hands.

Leave the dug spuds in the garden for a couple of hours to start the curing process.

To ensure longer storage for your crop of taters, lay them out on newspapers or a plastic table cloth in a single layer where they can dry out and continue the curing process for two weeks. Here in TN, I bring the summer crop inside where it is cool and lay them out on a table out of direct sunlight in the family room and leave the ceiling fans on to circulate the air.

The fall crop I lay out on newspapers in the garage where it is cool but doesn’t freeze. Later I store them in milk crates in a cool dark pantry. Potatoes exposed to sun, either in the garden or later and turn green should not be eaten. Check the spuds regularly and remove any soft or spoiling spuds.

I weighed each variety of potatoes to calculate the pound per square foot. I was pleased with the results. Total weight was 56.9 lbs which equates to .89 lb per square foot. Not bad considering that the average potato farmer usually gets about ½ lb per square foot. The Red Pontiacs were the biggest producer at 1.44 lbs per sq. foot of garden space. That means 23 lbs. of red potatoes in a 4’x4’ raised bed (spaced 8”-10”). That was about twice the production of the other taters in the same about of space. You can bet I’ll plant those again!


If you don’t have the space in your kitchen garden to dedicate to potato growing, there are other methods that may peak your interest. ‘Towers of Taters’ (as I call them) are a space-saver using materials already on hand or re-cycled. Stacks of tires, large round tomato cages, and bottomless containers (let your imagination run wild) work well. Place potato seed (whole or pieces of sprouted or soon to sprout potatoes with at least two eyes) in layers of straw or mulch, water well in full sun and watch beautiful, clean potatoes emerge. Fellow gardener Tom Moucka shows off his 'Tater Tower' – nice job Tom!

You can also plant tater seed in bales of straw or just lay them on the ground and cover with a thick layer of mulch. My great grandmother use to plant her peels. It was during the depression and food growing was a necessity not a luxury like today. As she prepared potatoes for supper she would peel them just a little thicker and lay those peels on the ground with the eyes up and cover with soil. My father remembers her continuous crops of potatoes when he was a child.

With a little extra effort and forethought you can have home grown spuds in your garden, yard or on your patio. Potatoes are a relatively inexpensive vegetable that you can readily buy at the store for about 2 bucks per pound (for organic) but when you taste fresh potatoes that you have grown yourself – priceless!


Wednesday, June 9, 2010

Lettuce Eat Greens on a Hot Summer Day

I managed to grow greens all winter with the use of cold frames and mini greenhouses...it was wonderful to have fresh salads and sauteed kale and chard all fall, winter and spring. But the thought of not being able to raise these veggies in the summer seemed unreasonable to me and extremely unfair. So, I got to thinking of ways to get shade in the full sun of the kitchen garden during the hot, humid summer days of Middle Tennessee...hoping I can indeed grow some green leaves to mix with the fresh tomatoes and peppers that I will begin harvesting soon.

Looking around for something to recycle, I came across an old screen door from the back porch that had seen better days and was in the pile of "I know I can do something cool with that so don't throw it out just yet". I hauled it out to the kitchen garden, held it over on of the 4' x 8' beds. Perfect size to provide shade and now all I needed was some way of elevating it over the bed.

I remembered a PVC pipe frame we made last fall for a mini greenhouse. Pushed it into the soil; one on each end of the bed and one in the middle...perfect support for the screen door to lay upon. Threaded some wire through the screen door to attach it firmly to the framework.

Viola, a double decker raised bed. Yeah, it's a little redneck but what's that matter to a Cracked Pot Gardener? It's functional and it just might work. My plan is to have cucumbers grow over the top, adding a little extra shade to the heat sensitive greens below.

In just a short time arugula, spicy greens, cut and come again lettuce from Renee's seeds www.reneesgarden.com and some type of wonderful Swiss lettuce (Thanks Heintz) that I can't pronounce are ready to eat. The carrots are coming a bit slower but who cares? they are growing. the cucumbers are starting to climb the PVC pipe frame and will start their trek across the top.

In a week I will sow more seed int he redneck screen house and see what happens. I'll keep you posted.

Sunday, January 31, 2010

Green under the snow


January seems an unlikely time of year to grow anything, much less veggies. But alas the kitchen garden is still growing. It has been a cold winter for Middle Tennessee and my plan of year round gardening has been a challenge to say the least.

In December we had temperature lows of 8 degrees. I buttoned down the hatches as best I could with an extra layer of plastic over the hoop house and various cold frames.

I lost a few things, some lettuces mostly and a few brussel sprouts. Everything else is either thriving (Swiss chard, kale and various spicy greens) or just hanging on waiting for warmer weather to jump start once again I hope (broccoli and cauliflower).

I’ve learned a lot along the way and have done little to aid just to see how the extreme weather conditions will affect my crops. I will make changes accordingly next year but this year has been one big experiment.

We recently had another winter storm with about 4-5 inches of snow with night time temperatures ranging from the teens to the twenties. I finally got out this morning to check on everything.

The kitchen garden was happy with its blanket of snow and as I lifted the cold frames, the salad greens, kale and Swiss chard were snug and un-frozen – lucky for me as I had not been able to give them extra cover since I had been under the weather myself.

The hoop house was sagging from the snow but it was okay after I removed the snow and tightened the plastic back down. 
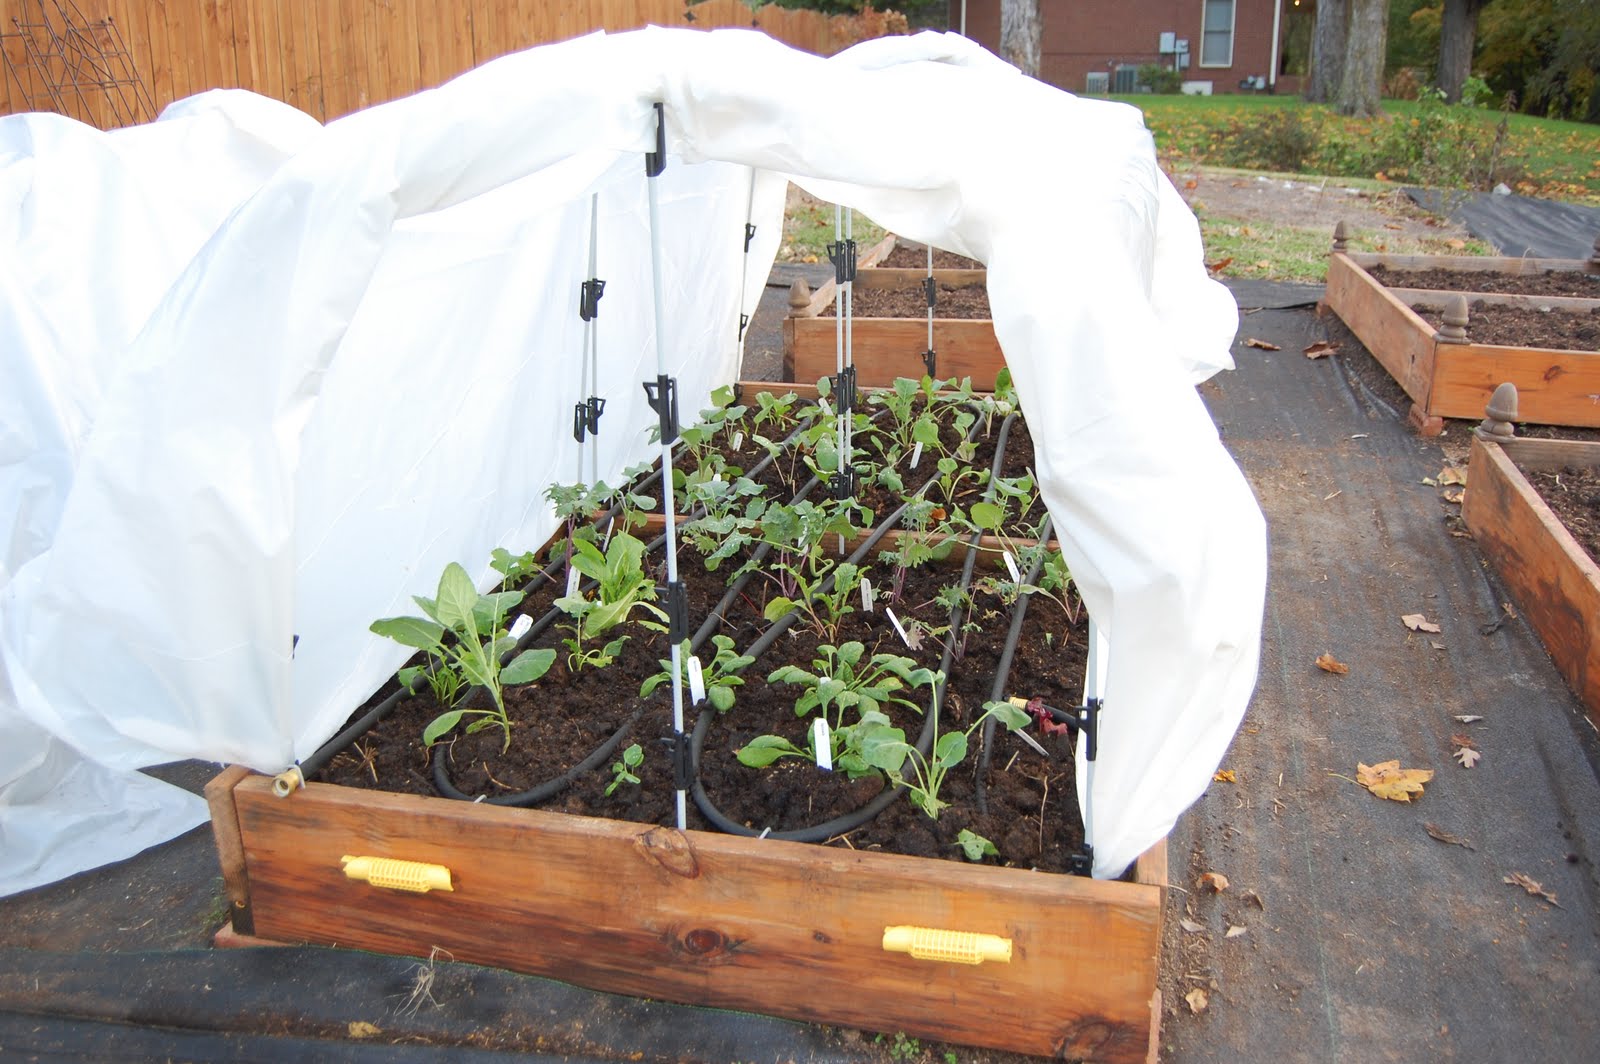
It is suppose to be back in the forties tomorrow with below freezing temperatures for many nights to come. February should be a busy month in the kitchen garden and I’m looking forward to planting potatoes, peas and more greens….bon appetite!

Monday, December 7, 2009

Kitchen Garden Success Story

Our friends, Tom and Lucy visited my raised bed kitchen garden this past fall and decided to go home and build one of their own. They located the garden near their driveway in a sunny location that they pass by everyday. Smart logic! This garden will be well tended or at least looked at on a daily basis so weeds, pests, harvest and water needs will never sneak up on them.

Landscape fabric was placed under the raised beds and between the beds to control weeds; a great use for this type of fabric and it will keep these new veggie gardeners from getting discouraged. Weeds also compete for water and nutrients so keeping them at bay makes sense.

They decided to build a hoop house over one of the 4'x8' beds to grow a cool season garden. Another plus to choosing a location that you pass by daily since the hoop house is hand ventilated each sunny day by opening the ends of the plastic. They have been picking greens here and there but yesterday they decided it was time to pick a bunch. That is a beautiful mess of collards, kale and Swiss chard. Tom plans on trying to grow greens and such all winter using the hoop house. Its so crazy it just might work...awesome job Tom and Lucy!!!


A beautiful bouquet of greens in December

Friday, November 27, 2009

Thankful for Kitchen Garden


On Thanksgiving day I picked a huge salad of various greens fresh from my garden. It is so wonderful to skip out the front door to the kitchen garden and be able to have fresh veggies at the end of November.

This kitchen garden is new this year. We started building it in the early spring using various materials. I like to experiment to see what works well so I can share that information with others. I have beds of concrete blocks which might not be the most fashionable but are easy to find and construct into a raised bed, inexpensive, won't rot and I like the fact that I can plant companion perennial herbs and flowers in the blocks themselves without having to take up room in the main planting area.

Pine 2" x 12" boards were used to make 9 beds in the garden. Again easy to find and make into a raised bed using metal L brackets on the inside corners plus an added crosspiece in the center. Inexpensive too, materials for all 9 beds ran right around one hundred bucks. Of course they will decay in three or four years possibly but easy to replace at that time I figured.

This fall we have added more beds, my husbands insists I'm crazy and I must be forgetting we are only two people but that has never stopped me before...besides, I love to share with neighbors and friends. These beds are built out of rough sawn red cedar from a local mill and should last many years without rotting. The lumber costs more than pine but not will not have to be replaced as quickly.

Soil depths are experimental as well. How deep does a raised bed have to be any how? Well, that depends on who you ask I've found out. Everyone has a different opinion from 5 inches to 18 is what I hear is optimal so again I'm going to try differing depths and check it out for myself.
After taking a month off to see other gardens, relatives and friends in Europe at the end of summer I thought perhaps I had missed the widow of opportunity for planting a cool season fall garden. Even though I got a late start it hasn't effected my amount of green veggies I harvest daily.

By constructing two hoop houses, one portable greenhouse, and three cold frames I am amazed how well everything is doing. I hope to have produce all winter here in Middle Tennessee. Since I have no heat options in these temporary structures it will be interesting to see what will survive, what will croak and what will flourish in the coldest stretch of winter.
Currently I am growing brussel sprouts (in and out of protection), broccoli, cauliflower, bok choy, broccoli raab, spicy greens, arugula, kohlrabi, swiss chard, corn salad and shallots (no cover), six or so varieties of lettuce, cilantro, spinach, kale and some others that I will remember later.

It is great to know I can stir fry or steam fresh greens make salads for every meal (or whenever I get a hankerin). Best of all it is knowing it is organic...in a time when you see organic vegetables shipped in from China, it is good to know I don't have to wonder where my food is coming from or what has been put on it.
Local is the way to go and growing your own is the best way to ensure that but the next best thing is buying from the local farmers wherever you live.

Because I got a late start this year I bought transplants and then started seeds to keep a continual harvest going. I found my best transplants at Riverbend Nursery of Franklin, TN and great majority of the seeds I planted are from Renee's Garden at http://www.reneesgarden.com/ Renee has wonderful seeds and such a variety of new and fun veggies to grow. Some of the seeds I planted are in packets printed in Swiss German and since I can't read the packages I can't you where they are from...thank goodness for latin plant names!

I am so thankful for my family, friends, and the bountiful harvest from my kitchen garden.

Friday, June 5, 2009

Growing Right Along


May was a busy month in the garden. We (okay, I) had projects galore. After a huge arbor, expansion of my "hobbit" house garden shed, including a living roof and a new kitchen garden, I have promised my husband no more "Cindy projects" for the rest of the year (pray I can keep my promise).
The kitchen garden consists of nine raised beds in the front side yard. Three made out of concrete blocks and six are untreated pine which I stained a cedar color on the outside to match the fence and blend a bit.

With the help of some great friends and my son Trevor we hauled composted horse poop (manure for you technical gardeners) and filled the beds 3/4 full then topped them off with leaf mulch. I worked in some wood pot ash since we had such an abundance from our newly installed wood stove.
Planting took place around the middle of May. I grew many of the plants in my greenhouse and purchased some from my neighbor, Joe Toni of Green Valley Greenhouses. As you can see everything is growing right along.

I am harvesting sweet banana peppers and some of the tomatoes are the size of golf balls. I'm trying to recycle materials for trellising beans, cucumbers, gourds and mini-pumpkins without looking too tacky...after all this garden is in our front yard.

I found a metal arbor at a yard sale and have installed it as the entrance and have lots more to do. I'm planting sunflowers, herbs and cut flowers to add color and encourage beneficial insects to stop and munch on any plant destroying suspects and pollinate.

Plus I want it to look as nice for neighbors and passer-bys. I have met a couple of neighbors who stopped to looked and compliment. A biker passed by yesterday and yelled "beautiful garden" which was very encouraging...especially when a neighbor told another neighbor my garden looked like a cemetery with cute little plots. What do they expect from a 'cracked pot gardener'?


Kitchen garden as of June 2nd...


Wednesday, April 15, 2009

With a Little Help from my Friends


I’ve been humming this song since Saturday when my sweet husband and friends Tom and Jodie all pitched in to help build some raised beds in my new kitchen garden.

We completed nine beds in all. Three are made out of concrete blocks and the rest out of untreated lumber. Now I know what you are thinking…concrete blocks?
Yes in deed…concrete blocks and I have my reasons which I will reveal as this new adventure rolls along.

The guys at the hardware store where we bought the lumber think I’m crazy for not using treated lumber (don’t you just love it when everyone is trying to second guess your plans) but I really don’t want to think about boards treated with arsenic in the same bed as my organic produce. Besides it is three times cheaper to use untreated wood. I know it will rot (thank goodness for that) eventually and then I will add some new boards. Ideally Cedar would be best and if I can find some at a low cost from a local mill I will use it for the next phase of raised beds (did I just type that?) It was about 100 bucks to build 6 raised four by eight beds – not bad.

I just needed extra space to grow more vegetables. Even though there are only two of us, I like to freeze, can, dehydrate enough garden fresh veggies to hold us through the winter. In fact I’m really planning on growing more vegetables and herbs year ‘round so as not to have to put up so much while having fresh produce all through the winter months.

This is my new place to play and experiment growing vegetables, herbs, flowers, and small fruits in an urban setting. Although I have a large yard, I know many folks don’t so I want to grow more produce in smaller spaces to help others do the same.

Did I mention this is in my front side yard? Don’t tell my neighbors (I’m sure they are wondering what in the world the cracked pot is up to now) I will stain the outsides of these beds to make them blend and look nice. After all, a kitchen garden should be pretty as well as practical.

I did plant 11 Mohawk viburnums (wow what a scent) as a hedge to soften the effects and as a barrier for west winds and to give the neighbors something pretty to look at until the boxes are full of beautiful, colorful vegetables, flowers and herbs.

Thank you Tom, Jodie and Sweetie – you are going to love the results!

Morel Mushrooms


I found morel mushrooms growing in my kitchen garden amongst the corn salad. I have to say I was stoked! Growing up in Northern Michigan morel mushroom hunting is something to look forward to after a long hard winter. I never even considered the fact that morels grew in Tennessee…what was I thinking?

My son was visiting this past week. He and his friend were telling me about their turkey hunting adventure of the morning and they mentioned that although they didn’t bag a bird they did find mushrooms.

Of course I quickly showed them my find in the garden and my son’s friend told me they find morels in the woods around here every year. What rock have I been under all these years? More importantly, what else have I been missing out on?

Each May, a huge morel festival is held in Boyne City, Michigan
http://www.morelfest.com/ where hundreds of folks come from all over the country to hunt the elusive shrooms. I remember as a child going mushroom hunting with the family. We always had a contest to see who could find the most.

We had our favorite spots on the family farm; the woods near Loeb creek, in the clearing by our family cabin, and along an old logging trail cut through the swamp. Sometimes we would go on a Sunday morning after all the chores were done to state land a few miles away.

It was hard to concentrate sometimes while looking for morel mushrooms. They blend into their surroundings so one has to concentrate. That was easier said then done when wildflowers like trilliums were catching my eye and I was haphazardly swatting black flies that insisted on swarming around my head. (a small price to pay for such an adventure)

My little brother Mike always found the most. He was younger and a lot closer to the ground then the rest of us. Or at least that is the excuse we always used.

After all the fun my parents could handle in the woods with 4 kids we would come home and my mom would wash and swish the mess of shrooms in a cold sink of water. Then she would melt some butter in the cast iron skillet and simmer the morels until tender. A little salt and pepper for seasoning and viola, dinner was served. What a treat, what great memories!

I dried the six mushrooms I found in hopes more will come up. It is easy to hydrate them when I’m ready to serve them up. Some folks hunt and pick morel mushrooms just to dry and sell to restaurants and the like. If I remember right, they bring a pretty penny per pound. (and it takes a lot of dried mushrooms to make a pound!)

I rather like the idea of morel mushrooms coming to me. No ticks, chiggers or other surprises. But now that I know they grow in Tennessee I guess I am willing to venture out and find more. Check out this website called the Morel Mushroom Hunting club. They have great information and reports of mushroom (not just morels) finds broken down into states with dates and names.
http://morelmushroomhunting.com/morelfinds.html

Thursday, November 6, 2008

Grapes in Abundance

Grapes in the garden provide shade, fruit for culinary adventures and pliable vines for wreaths or anything in the garden or home that needs a little extra help in the funk department.

This year I had such an abundance of grapes that I was able to share (or redistribute?) the wealth with friends, neighbors and the birds of course.

The grapes were already established on a fence in the backyard when we bought the property seven years ago. Every winter I prune the vines back and make sure the wire that runs alone the fence to hold the meandering vines is in good repair.

If you haven’t guessed by now from the picture, they are concord grapes with large seeds. The color is deep, flavor is incredible - maybe even taste purple (Under the Tuscan Sun) but the seeds slow you down if you are trying to eat a handful while you are suppose to be gathering veggies from the kitchen garden these grapes border.
I decided to make grape jelly this year so I harvested a couple of huge baskets and got to work. After I washed the huge clusters I laid them out on towels to dry.
Next I plopped them into a large heavy stainless steel stock pot, added some water, set the temperature on med-low and put the cover on.


When they softened, I took them off the heat and put them in a stainless steel, heavy duty colander that nested in another stainless steel stock pot to catch all the juice. I mashed (pressed) the poor things until I had all the juice out and nothing but pulp left in the colander. I feed the skins and seeds to the compost pile…I wonder how many concord grapes will be coming up in the spring?

I wanted to put them in a jelly bag or cheese cloth but I could not find any so I determined the juice in the pan looked clear enough for jelly (for me and my family).

Next I followed the directions on the powdered pectin box – I bought some for low sugar and used half the amount of sugar. The jelly jars were still hot in the dishwasher (I used the sterilize setting). I put the lids and rings in boiling water so they were ready.

I ladled the hot jelly into the jelly jars, wiped off any sticky business, placed the lid on and screwed the ring nice and tight. I set them in a group on the counter and waited for them to seal. Some folks water bath…I chose not to for these batches of grape jelly.

Later I checked and all had sealed so I wrote the date and other notations like ½ sugar. I did make a batch with full sugar for all my sweet friends.

As you can see they came out “pretty as a picture” and a real treat at the breakfast table!